A1: Menus
Last revised: 3:05 PM Wednesday, May 1, 2019Android Goals:
- Further practice using callbacks; onDraw
HCI Goals:
- Further practice with state machines and event handling
- Record user study data
- Produce plausible experiment results (within expected ranges)
- Understand pie menus
- Overview of assignment
- Key Files to look at
- Part 0: Overview
- Part 1: Implement MenuExperimentView and MainActivity
- Part 2: Implement Pie and Normal Menus
- Part 3: Conduct and Write Up User Study
- Submission Instructions
Overview of assignment
This is a two part assignment. The coding should take about 5 hours, and re-uses many concepts from ColorPicker. Please start early, and reach out if you find you are spending more than 10 hours.
The user study will take about the same. Your time will include the following: Write your consent form using our template and print out (1 hr) recruit, consent and run 4 participants (1-2 hours); Download your data and importing it into the spreadsheet we provide (30 mins); Analyze the data (1 hr) and write the report (1-2 hours). Again, reach out if spending more than double the expected time.
Key Files to look at
- ExperimentSession.java
- Class that sets up all the conditions for the experiment and creates an iterator with all the trials.
- ExperimentTrial.java
- Class that stores all the data for a single trial.
- MainActivity.java
- Activity that displays the option to navigate between sessions. Also adds the corresponding menu view to the view hierarchy.
- MenuExperimentView
- View that can displays and handle input for a menu. This is the parent class of NormalMenuView and PieMenuView
- PieMenuView
- View that implements pie menus
- NormalMenuView
- View that implements normal linear menus
Here’s a link to the screen recording of the app.
NOTE: You need to be logged into your UW account to be able to view the link.
Part 0: Overview
Read this spec and take a look at the classes listed above.
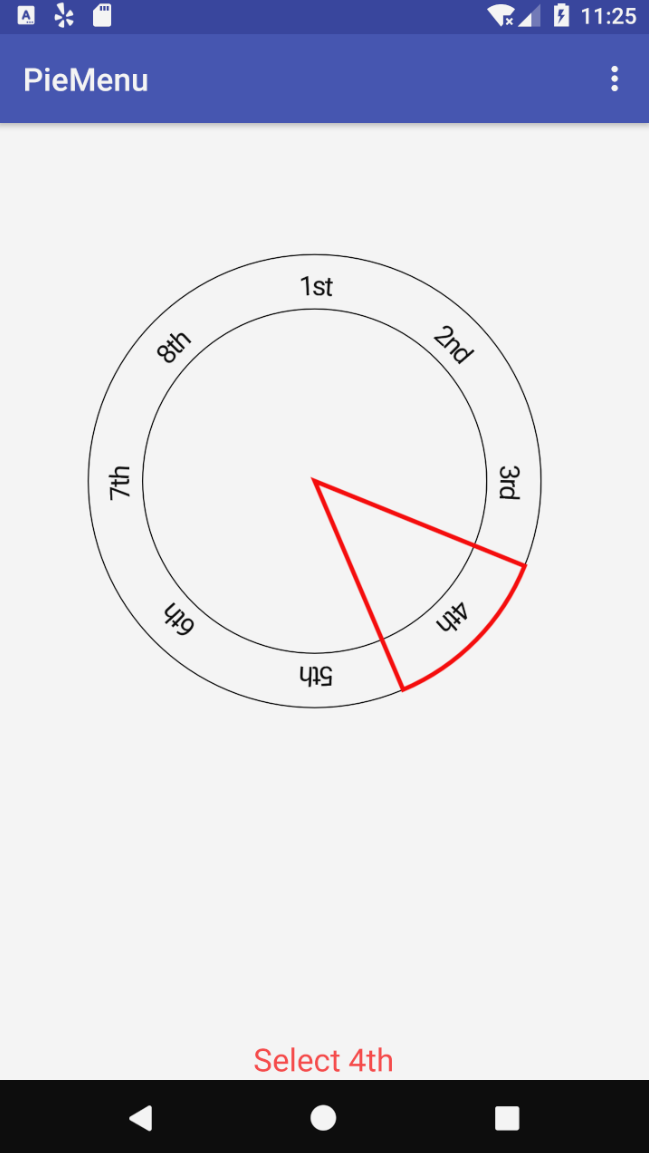
You will be implementing a class that can display a pie menu, and a class that can display a linear menu for use in an experiment comparing which is faster for the user to select menu items from. By menu items we mean the individual items in a menu, such as the number 1 in the sample video.
This experiment will have 6 conditions, each of which will include
NUM_REPEATS*ITEM_MAX trials, as follows.
| Menus | ||
|---|---|---|
| Tasks | PIE |
NORMAL |
LINEAR |
NUM_REPEATS*ITEM_MAX | NUM_REPEATS*ITEM_MAX |
RELATIVE |
NUM_REPEATS*ITEM_MAX | NUM_REPEATS*ITEM_MAX |
UNCLASS |
NUM_REPEATS*ITEM_MAX | NUM_REPEATS*ITEM_MAX |
The two menu types (specified in an Enum in the code) are PIE
(round) and NORMAL (linear).
The three task types (also an Enum) are LINEAR (menu items such as
1,2,3,4,5,6,7,8) ; RELATIVE (menu items such as
Up/UpRight/Right/Down/etc…); and UNCLASS (menu items such as
Print/Cast/Bookmark/etc);
The trials are specific combinations of menu item, task type, and menu type. So for example, one trial might involve showing the user a pie menu, with the numbers 1..8 in it, and asking them to select number 3. The participant can select any option, no matter what as soon as they complete a selection, the result is recorded and the next trial begins.
For any given session (one user’s worth of trials), each combination
of menu type, task type, and menu item, will be repeated NUM_REPEATS
times (NUM_REPEATS is specified in ExperimentSession.java). In
addition, for any specific combination of menu type and task type, at
most ITEM_MAX items (a total of ITEM_MAX*NUM_REPEATS trials) will
be shown to the user. If you set both of these to 1 for testing, you
can test all your conditions very quickly. Make sure to set them to
the required values for user testing: NUM_REPEATS must be at least
3, and ITEM_MAX must be at least 4.
In the second half (week 2) of this project, you will recruit 4
friends or students and have them complete one session each. Thus, you
will have a total of 4 (participant sessions) * 6 (conditions) *
ITEM_MAX*NUM_REPEATS, or 288, data points when you have completed
this assignment. You will analyze the data from this experiment in
part 2 of this project.
We have implemented in ExperimentSession the code for you to generate
all of the trials from a setup file called menuContents.csv found in
the assets directory. Look at ExperimentSession.java, please understand
createTrials method which sets up conditions for
whole experiment. ExperimentSession is an iterator, so to run the
trials for a give session you just use session.next as long as
session.getNext is true.
Part 1: Implement MenuExperimentView and MainActivity
Tasks
- Implement
onDrawinMenuExperimentView - Implement
onTouchEventMenuExperimentView - Implement
showMenuForTrialinMainActivity - Implement
onTrialCompletedinMainActivity
For this part, you will be working in MenuExperimentView.java. This
class includes several fields that you will need to implement. You
will implement the state machine logic in onTouchEvent (similar to
what you’ve done in ColorPicker) and the logic to draw the menu in
onDraw. You will also implement the code necessary to add and remove
menu views from the application when a trial ends and
onOptionSelected() is called.
One tricky thing about context menus – they can appear anywhere in
your user interface. To support this, we set things up so that the
menu view is going to MATCH_PARENT width and height. However, the
menu itself should show up right where the user presses down.
Handling Touch Events
You will handle touch input by implementing the onTouchEvent
method. This is the event handler that is invoked when a touch occurs
in this view. Note that onTouchEvent is implemented in the parent
class, MenuExperimentView and is not changed in the child
classes. The only thing they have to modify for onTouchEvent to
work properly is essentialGeometry, since they have the exact same
state machine.
- For the
PieMenu,essentialGeometryshould return -1 if the pointer has moved less thanMIN_DISTsince selection started, and otherwise return the item number currently being selected. Item number is the menu item that a ray from the center of the menu to the pointer intersects. - For the
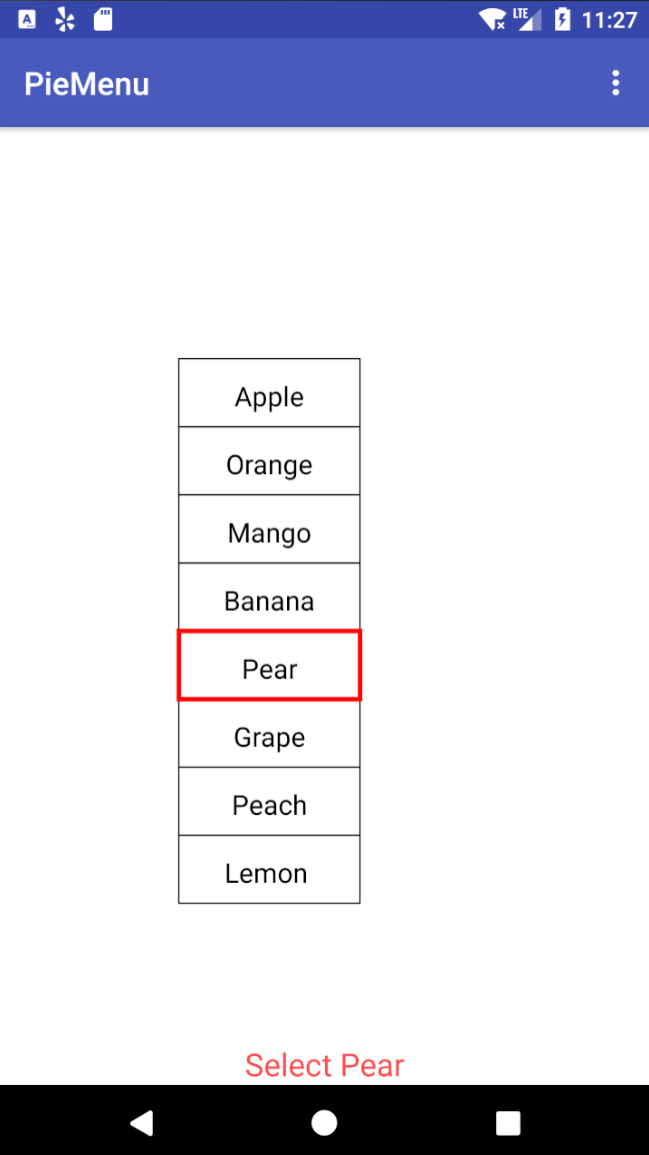
NormalMenu,essentialGeometryshould return -1 if the pointer is outside the bounds of the menu in any direction or has moved less thanMIN_DISTsince interaction started. Otherwise it should return the item number of the menu item that the pointer is currently inside of.
You need to keep track of two main states START and
SELECTING. When in the SELECTING state you need to distinguish
between the event type to determine if the user has selected an option
or if they are still in the middle of making a choice.
Relevant mouse events include ACTION_DOWN, ACTION_MOVE, and
ACTION_UP; think about how these mouse events relate to the change
and how the UI should respond to these events.
where the actions should be as follows:
startSelection() {
// 0) record starting point
// 1) call trial.startTrial(), passing it the
// pointer position
// 2) invalidate
}
endSelection() {
// 1) call trial.endTrial(), passing it the pointer
// position and the currently selected item
// 2) call onTrialCompleted(trial)
}
dragResult(){
// check if the item selected has changed. If so
// 1) update your menu's model
// 2) invalidate
}
Note that you do not need to check whether the user clicked on the correct menu item when you call endTrial().
Implement onDraw
For onDraw(), your will do some setup that will allow your
subclasses to draw properly. First, you will need to check if you are
in the proper state to draw (only draw when in the SELECTING
state).
Next, you really want to draw from the (0,0) location of the menu,
rather than the (0,0) of the parent. But remember that your width and
height are set using MATCH_PARENT. To fix this, we need to change
the coordinate system of the canvas so that (0,0) is at the
startPoint for this interaction.
Finally, since this is an abstract class, we need to call the real
drawing method, which our children will implement. This is called
drawMenu() and should be overridden by PieMenuView and
NormalMenuView. Therefore, your onDraw implementation in
MenuExperimentView.java will be pretty short.
The starter code contains several useful fields that are
useful for drawing the menus on screen. For PieMenu, the given RADIUS
corresponds to the outer radius. The inner radius is defined by RADIUS - TEXT_SIZE * 2.
MainActivity
In MainActivity you will implement the method
showMenuForTrial(ExperimentTrial trial). This method will create a
new MenuExperimentView of the type specified in the trial, set its
layout parameters so that it fills its parent and is visible on the
screen, and register a callback with it that knows what to do when a
trial is completed.
MainActivity also needs to implement the code to respond to
onTrialCompleted. In particular, this code should always remove the
current menu being shown. Then it should check if the session is
over (remember the session is an iterator), and if not call
showMenuForTrial with the next trial. If the session is over, it
should update text of InstructionTextView to say that the session is
completed. This means that until the next session is started, the system should not display any menus
if the user clicks. You can also display a
Toast.
Related APIS
- View: See documentation on Drawing
- MouseEvent Constants
Part 2: Implement Pie and Normal Menus
Tasks
PieMenuView: ImplementessentialGeometryanddrawMenuNormalMenuView: ImplementessentialGeometryanddrawMenu
Both PieMenuView and NormalMenuView extend MenuExperimentView. You
will implement essentialGeometry and determine what menu item the
touch event maps to. You’ll have to come up with the math logic to map
from touch event to an item index.
You will also implement drawMenu which at a minimum draws the menus as shown in
the screenshots. If you want to do something different, you may, as
long as the size and position of each menu item does not change. For
example, you can override the paint properties defined in
MenuExperimentView, position the text differently, or draw more
decorations on the menus.
The radius of the circle in the pie menu is RADIUS - TEXT_SIZE * 2.
The width of each item in the normal menu is CELL_WIDTH and the height is
CELL_HEIGHT.
Some hints for the pie menu
drawArcwill draw a pizza-pie shaped arc, so you can do things like highlight a menu item with a single method call.- You will need a rotational offset to ensure the top menu item is at the top of the pie (both when drawing and in essential geometry) because angle is traditionally measured from cardinal east. You can add this in radians before converting from angle to index.
Related APIs
Part 3: Conduct and Write Up User Study
Tasks
- Conduct user study
- Run a trial on yourself
- Create a final consent form from this sample
- Recruit 4 participants
- Have them sign your consent form
- Have them complete a session with
MAX_ITEMSset to at least 4 andNUM_REPEATSset to 3. - Download the recorded data
- Analyze recorded data
- Write a report
Conduct User Study
To finalize the consent form, you will need to copy over the text from our sample consent and modify it in all of the places marked as such. You should print out two copies of the consent form for each participant – one for them and one for you.
You will need to try out your own program as a participant to fill in the consent form (since you’ll need to know how long it takes. This is also a good time to double check that your data is not lost by downloading it.
Downloading your data
On mac OS X, adb pull /storage/emulated/0/CSE340_PieMenu/TestResult.csv will
download your data to the current directory you are in (or you can
specify a location).
On all platforms, if you have Android Studio installed you can use
a tool window called Device File Manager. This allows you to directly
access the files on your Android device (emulated or physical) through a
GUI window. If you aren’t comfortable with using adb over the the command line,
this is a great option.
1) Connect your Android device. If you use an emulator just start the emulator like you usually would. If you use a physical device connect it to your computer over USB like you usually would when loading your Android apps.
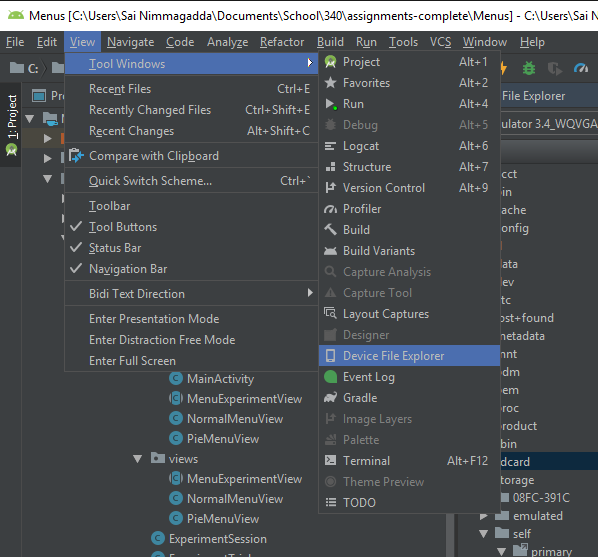
2) In the top menu, press View -> Tool Windows -> Device File Explorer. This will open a window that details the contents of your Android device’s file system.
3) Navigate to /storage/emulated/0/CSE340_PieMenu/TestResult.csv. You should be able
to open the file and even save it elsewhere on your computer’s file system.
Create a clean CSV
You should use the hamburger menu in the app you just implemented to Clear Result CSV
before starting your study so that your data does not contaminate your results.
Recruit participants and have them sign your consent form
You can ask friends or classmates for help. Do not coerce anyone into participating in your study. Make sure they know they have a choice, and have read and signed the consent form. You will be required to turn in signed consent forms with your report.
Collect data
Have each participant complete a session. Once all participants are done, you and download your final data file. It should have 72*4 (288) data points in it. You can use the emulator or your phone for this, and any mouse you want. You will need to turn in your final data file with your report.
Write a Report
You will need to write up a brief report about your study. We provide a template.
Submission Instructions
You will turn in the following files here:
Part 1:
- MainActivity.java
- MenuExperimentView.java
- NormalMenuView.java
- PieMenuView.java
Part 2:
- TestResult.csv
- Signed consent forms (images/scans)
- Report.pdf
Grading (10 pts)
- First Half (4 points)
- State machine implementation works: 1
- Correctly implements essentialGeometry in NormalMenu and PieMenu: 1
- Correctly implements drawMenu in NormalMenu and PieMenu: 1
- Correctly handles trials and callbacks in MainActivity: 1
- Turn-in and compiles: 1pt
- Second Half (5 points)
- Have reasonable CSV output and charts: 1pt
- Have signed consent forms: 1pt
- Report:
- Description of study process: 1pt
- Demonstrate understanding of results: 1pt
- Draw appropriate conclusions about linear vs. pie menu: 1pt