EX2: Layout
Last revised: 11:16 AM Thursday, April 13, 2019Android Goals:
- Understand Android layout GUI and XML
- Familiarize with Android programmatic layout API
- Understand Android constraints implementation
- Handle portrait and landscape orientation correctly
- Handle fixed and variable size container views
HCI Goals:
- Make use of interactor hierarchy
- Use constraints to create responsive layouts
- Make use of complex built-in layouts
- Implement reusable layouts
- Understand how scrolling works
- Understand how sizes influence layout
Part 1
part1.xml can be found in the res/layout directory in Android Studio once the layout project has been opened.
Tasks:
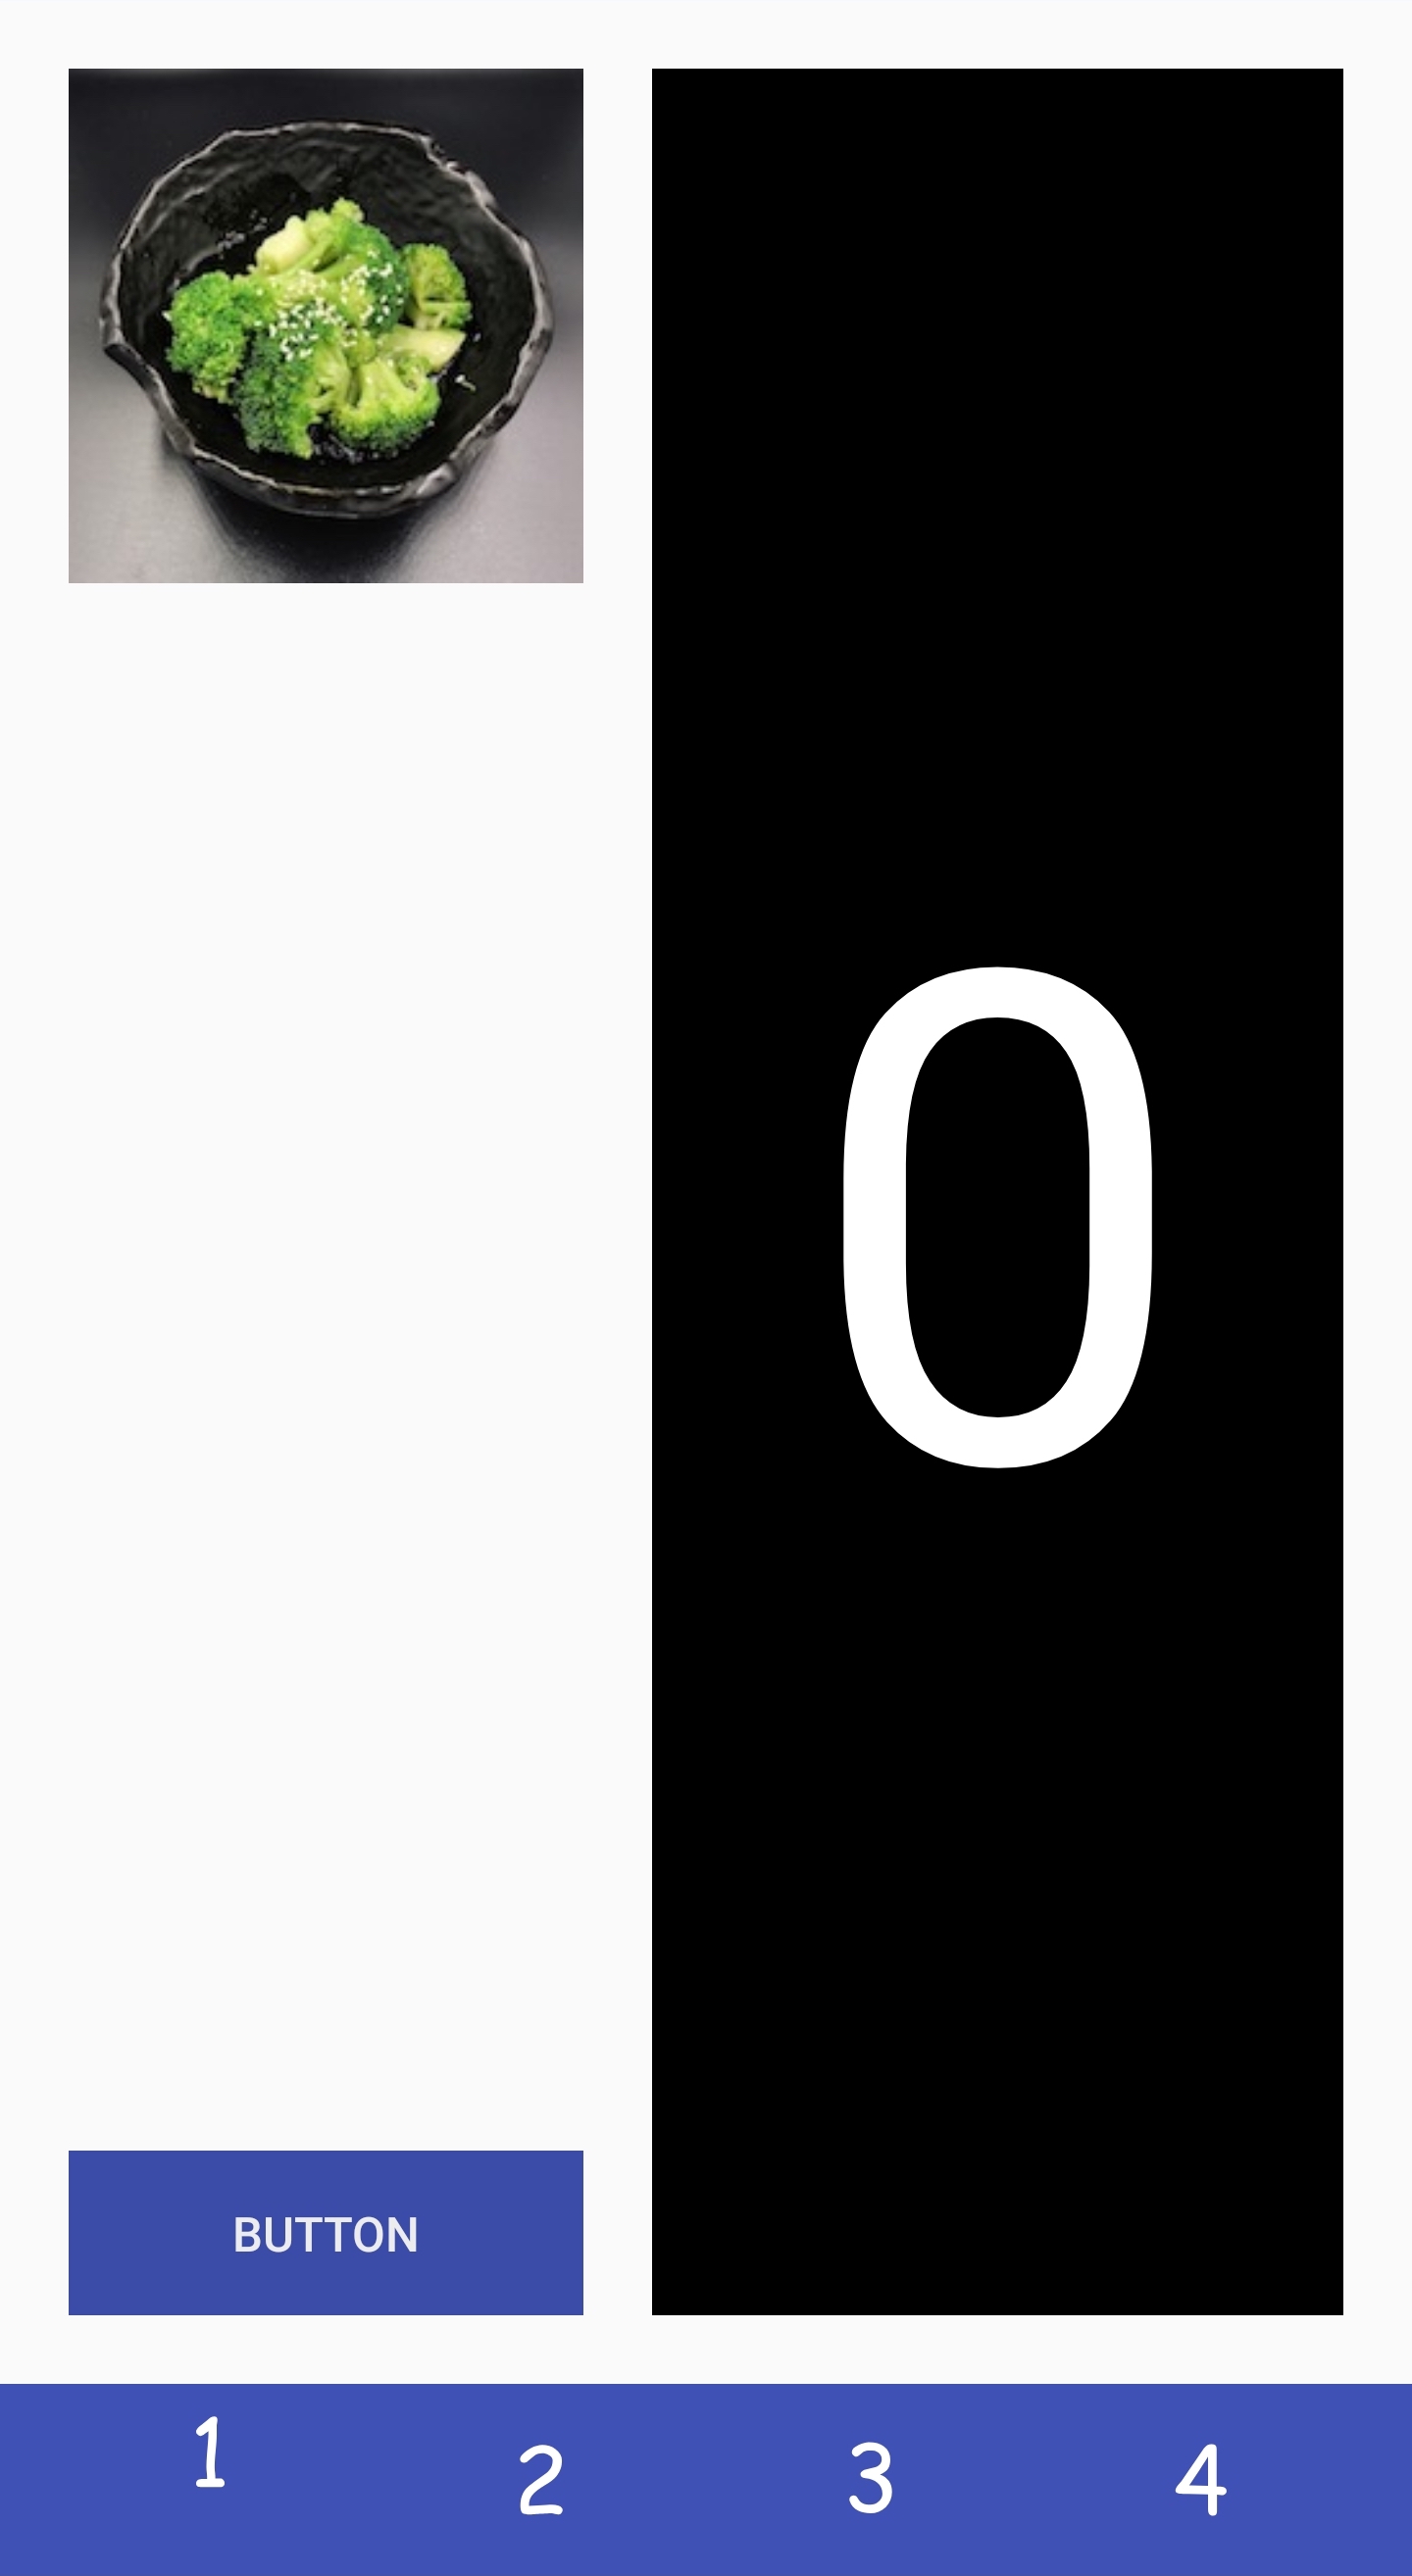
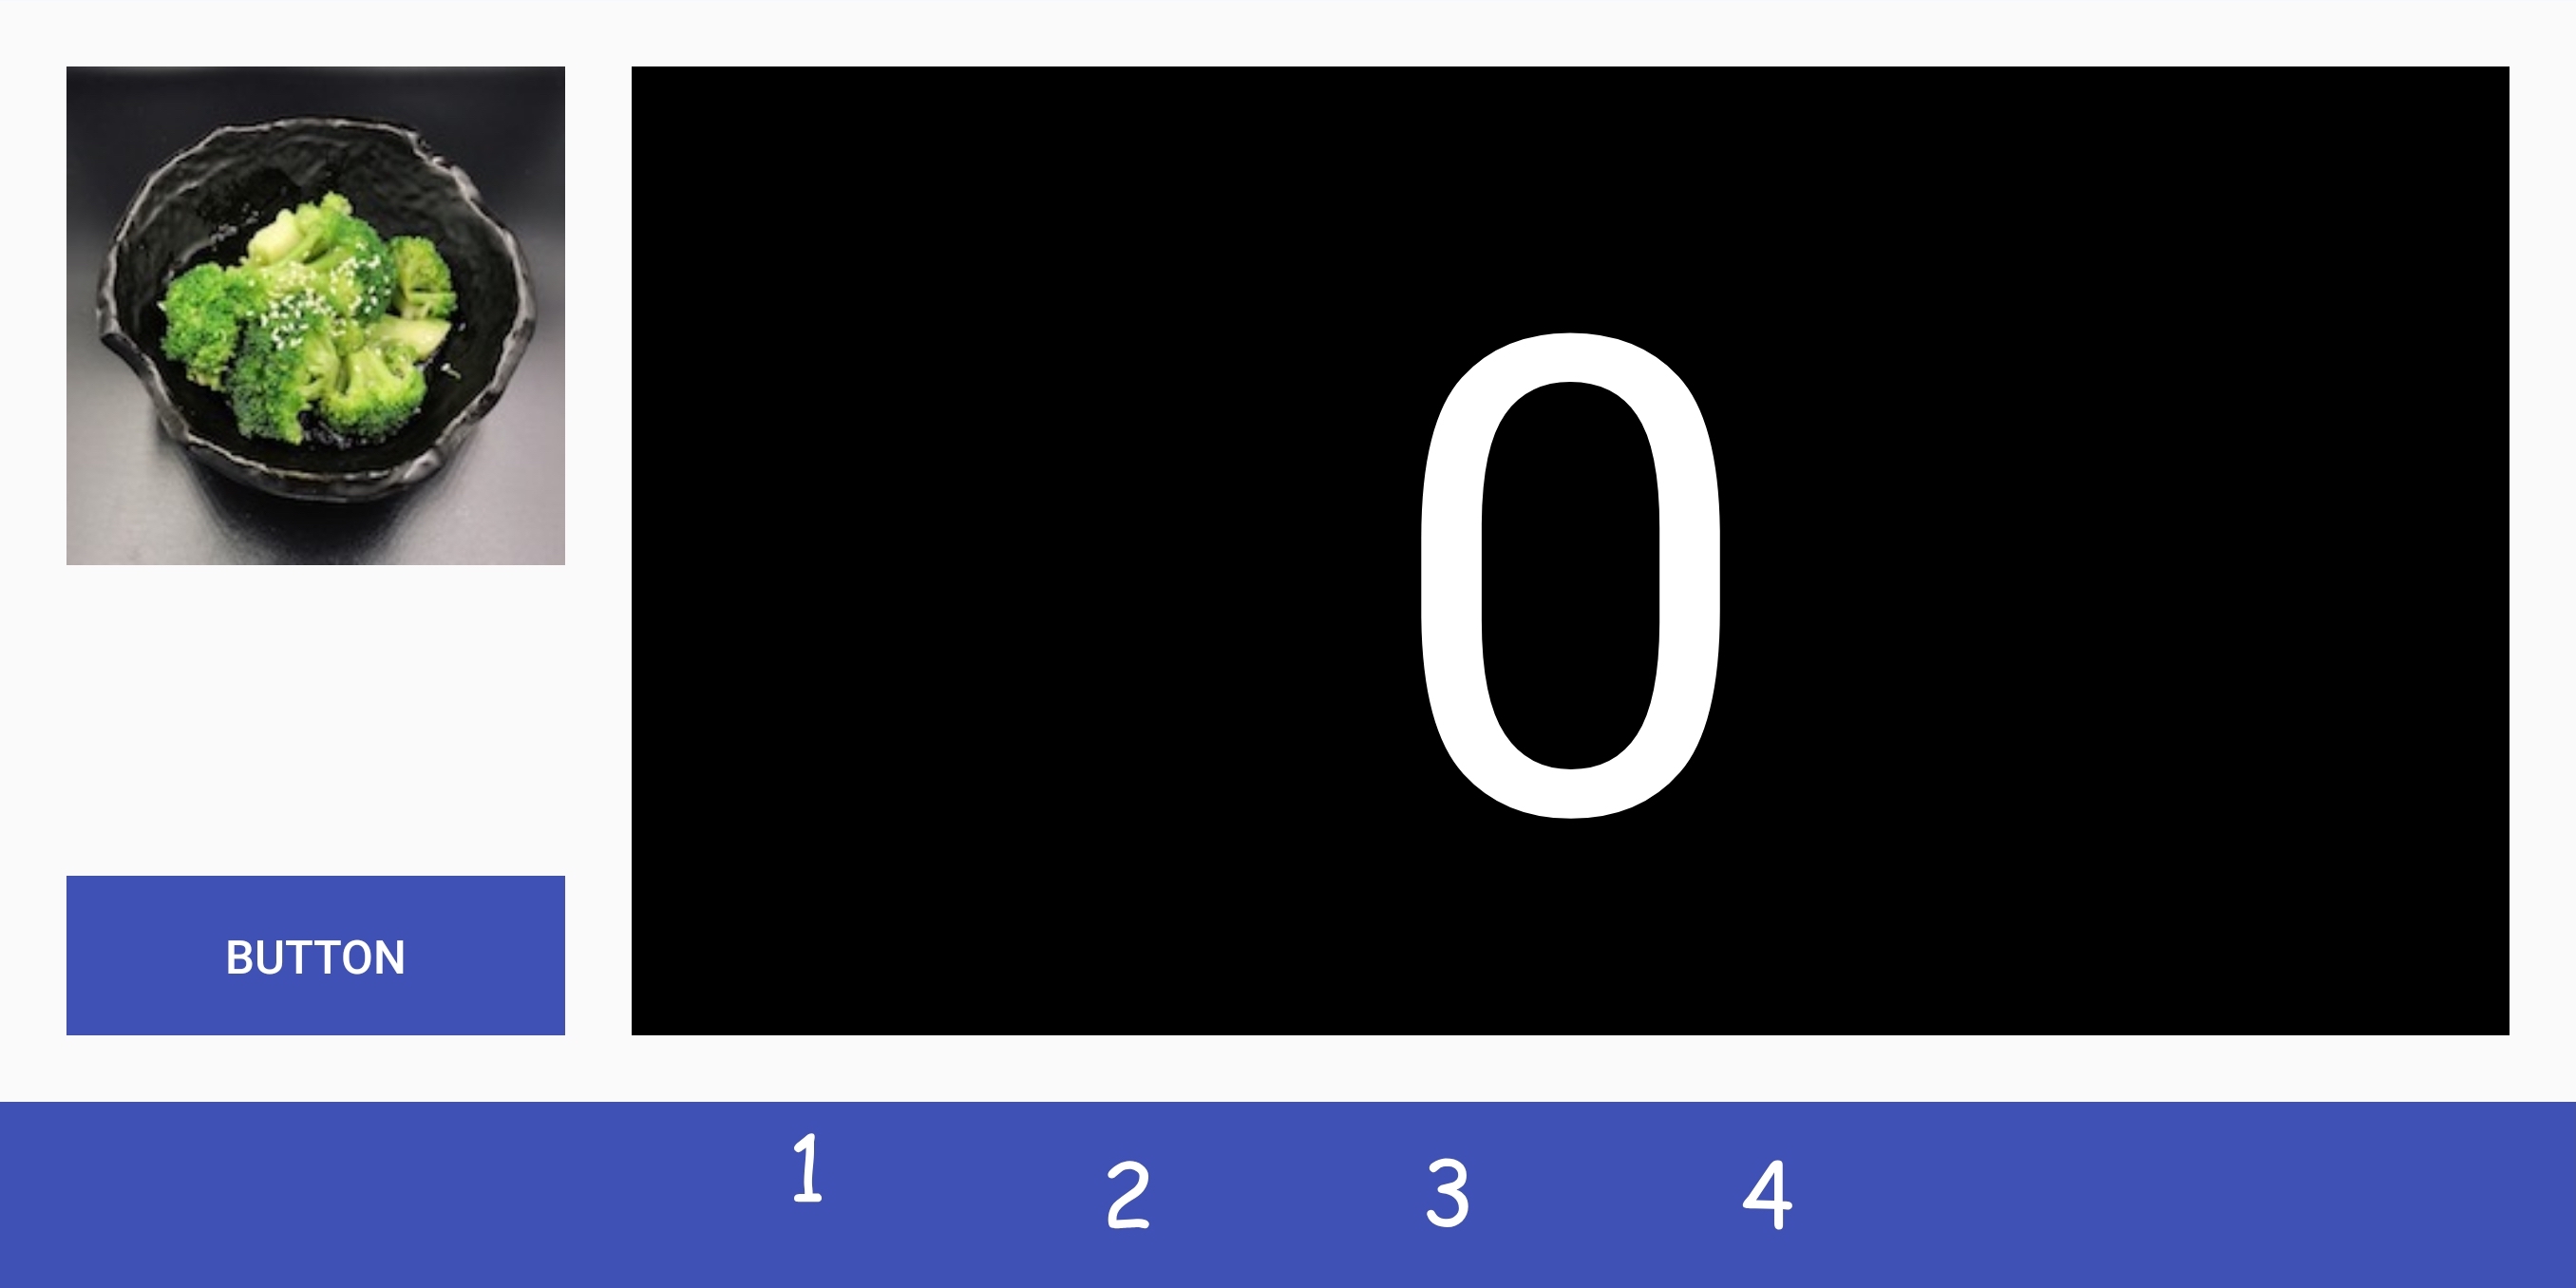
- Create
TextView,ImageView, andButton - Constrain them for automatic portrait and landscape layouts
First, create a Button in part1.xml. It should say BUTTON by default. Make sure the background color matches ours, colorPrimary. Color abstractions in values/colors.xml allow us to avoid changing values in multiple places in the future.
Next, create a TextView. Set the background color to black and add a 0 as the text. The font should be white and 200sp. There also exists a similar values/strings.xml which allows us to store strings in a central location. For our purposes, you can hardcode the text into part1.xml. You may notice an IDE warning about hardcoded strings, just ignore it.
Finally, create an ImageView. It should contain drawables/food_0 and be 150dp by 150dp.
All three views will have at least two sides along the perimeter of the ConstraintLayout. These sides should have a margin of 20dp preventing the views from touching the edge. As the screen rotates/resizes, all views should stay 20dp from the edge.
The ImageView should reside in the top left. As the screen rotates/resizes, it should remain constant in size.
The Button should reside in the bottom left. Its width should match the ImageView and it should be perfectly aligned with it. As the screen rotates/resizes, it should remain constant in size.
The TextView should be 20dp from the right edge of the ImageView. As the screen rotates/resizes, it should change width to maintain the 20dp margin.
NOTE: It is possible to position some of the views in this assignment without constraints due to the fact that unconstrained views float upwards unless prevented by another view or a margin. The purpose of this assignment is to practice constraints so such solutions will not be accepted. Every view you add during this assignment, including the other parts, will require at least one constraint.
Part 2
part2.xml can be found in the res/layout directory in Android Studio once the layout project has been opened.
Tasks:
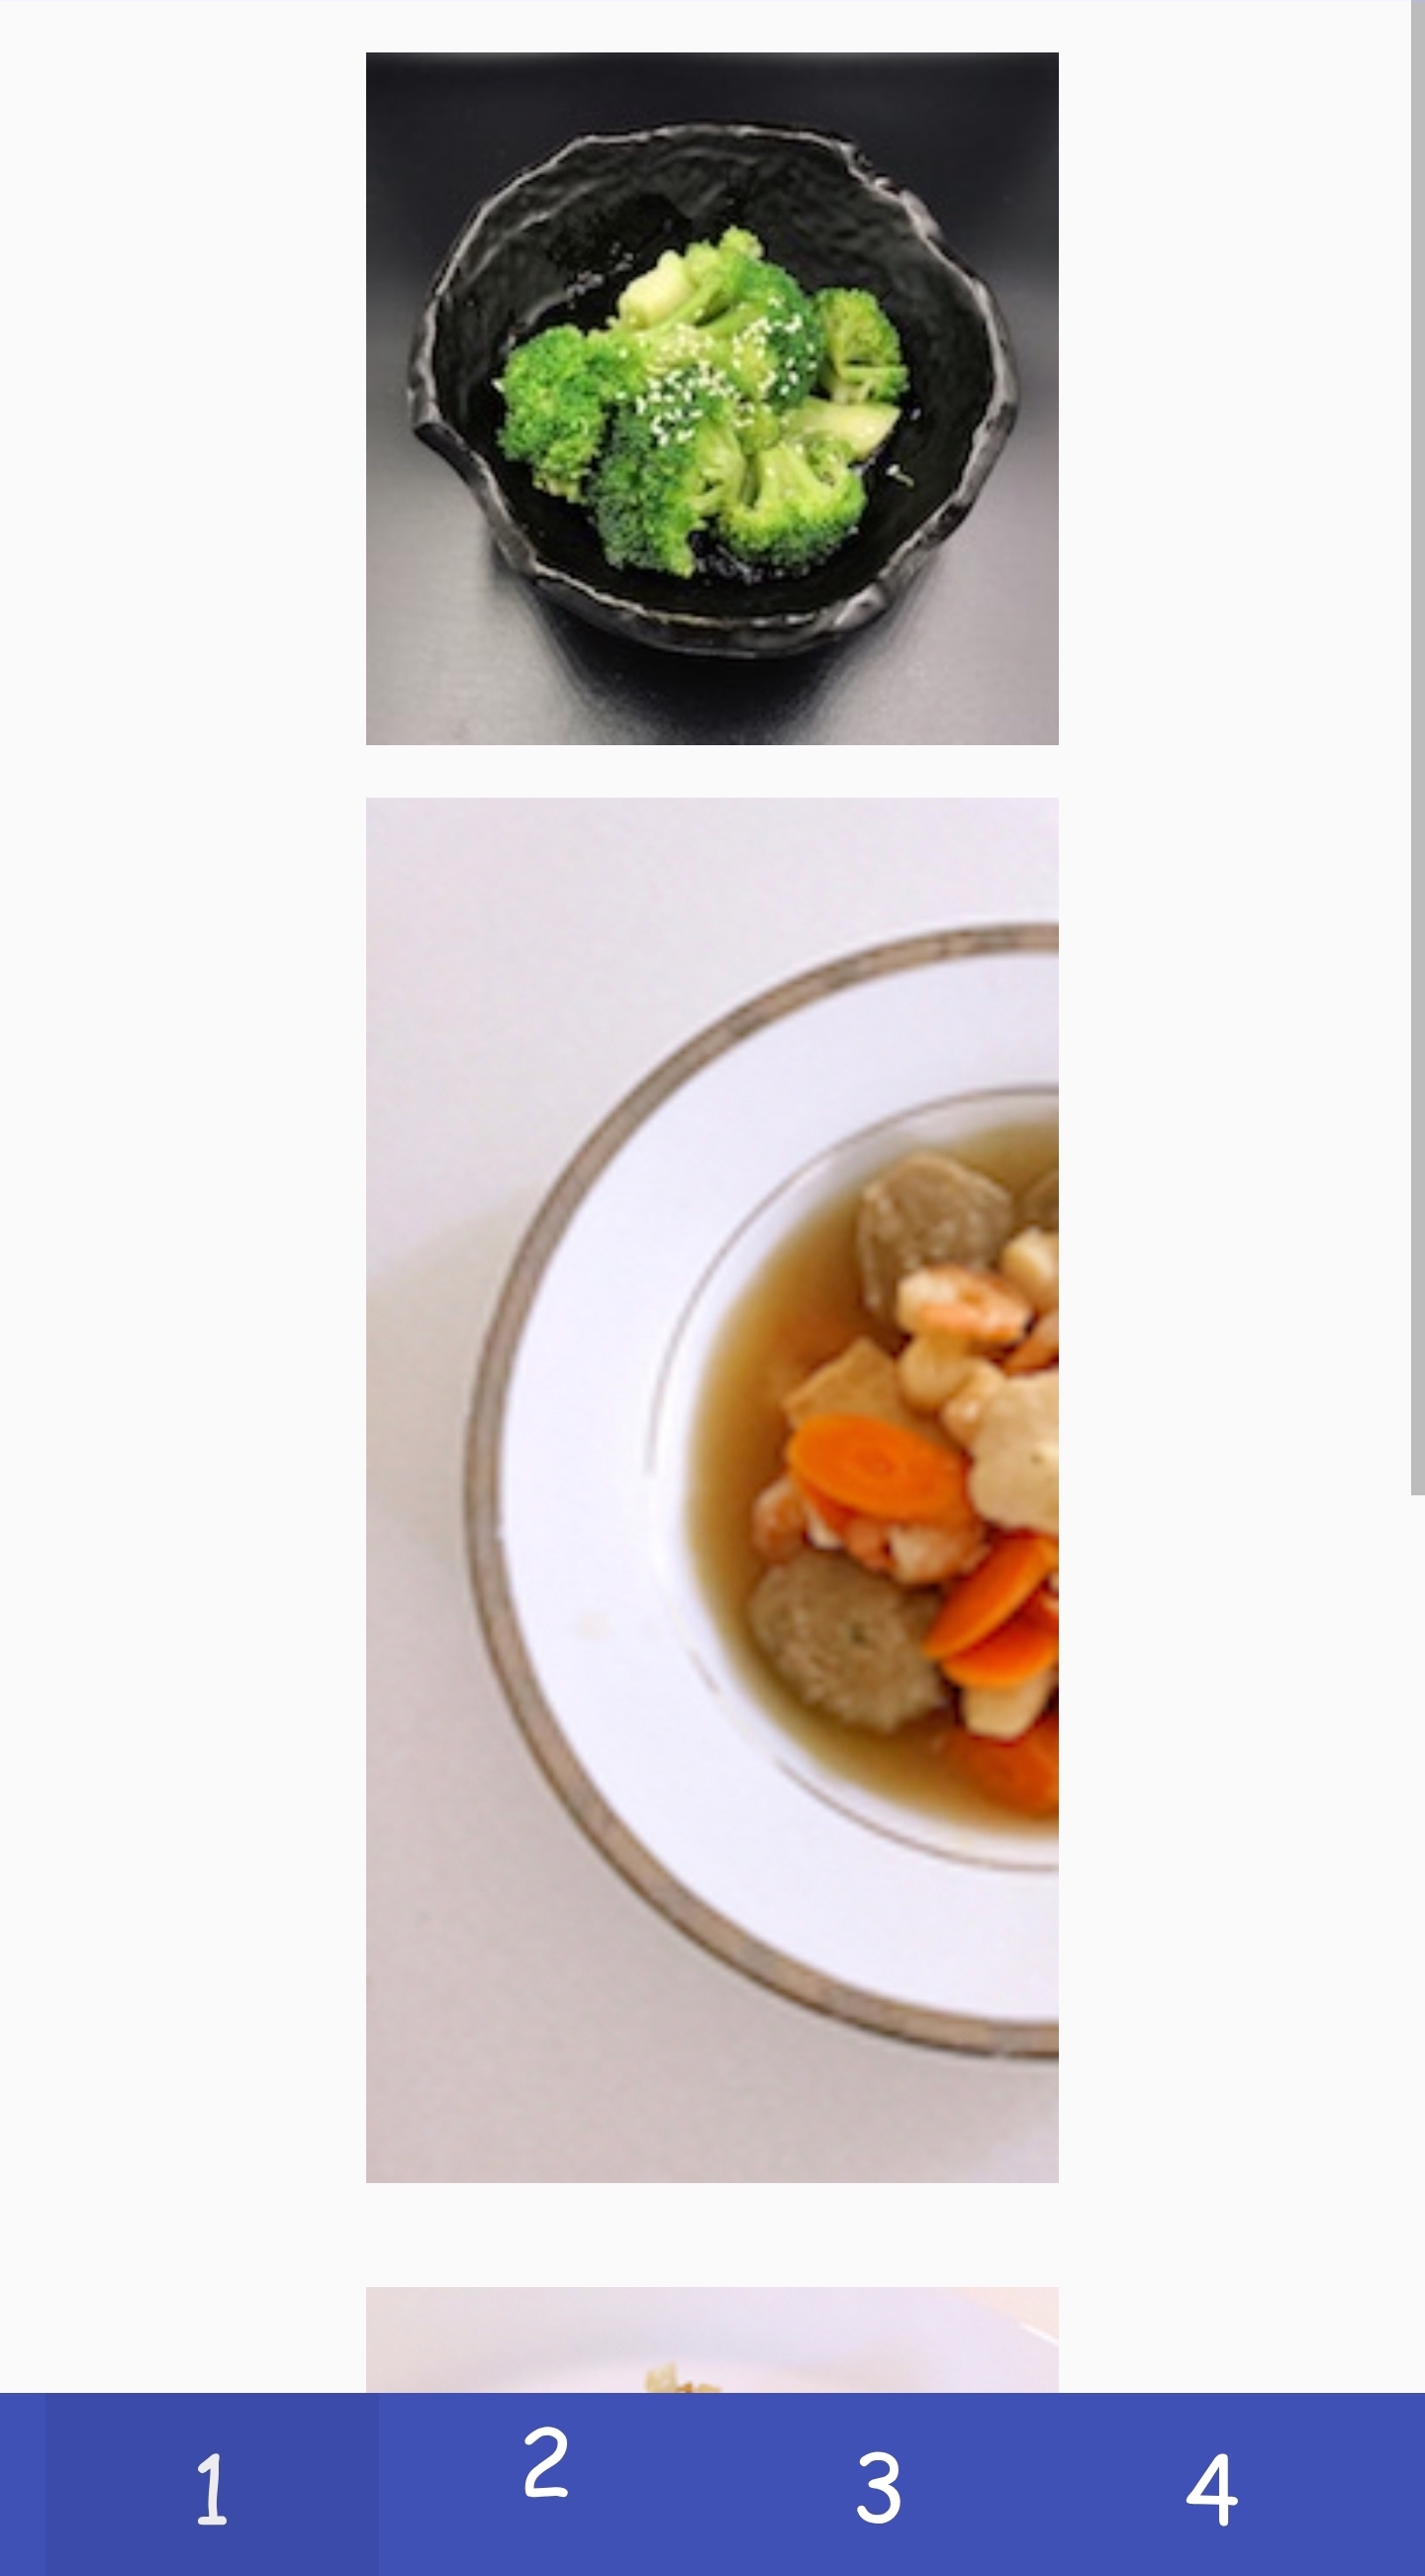
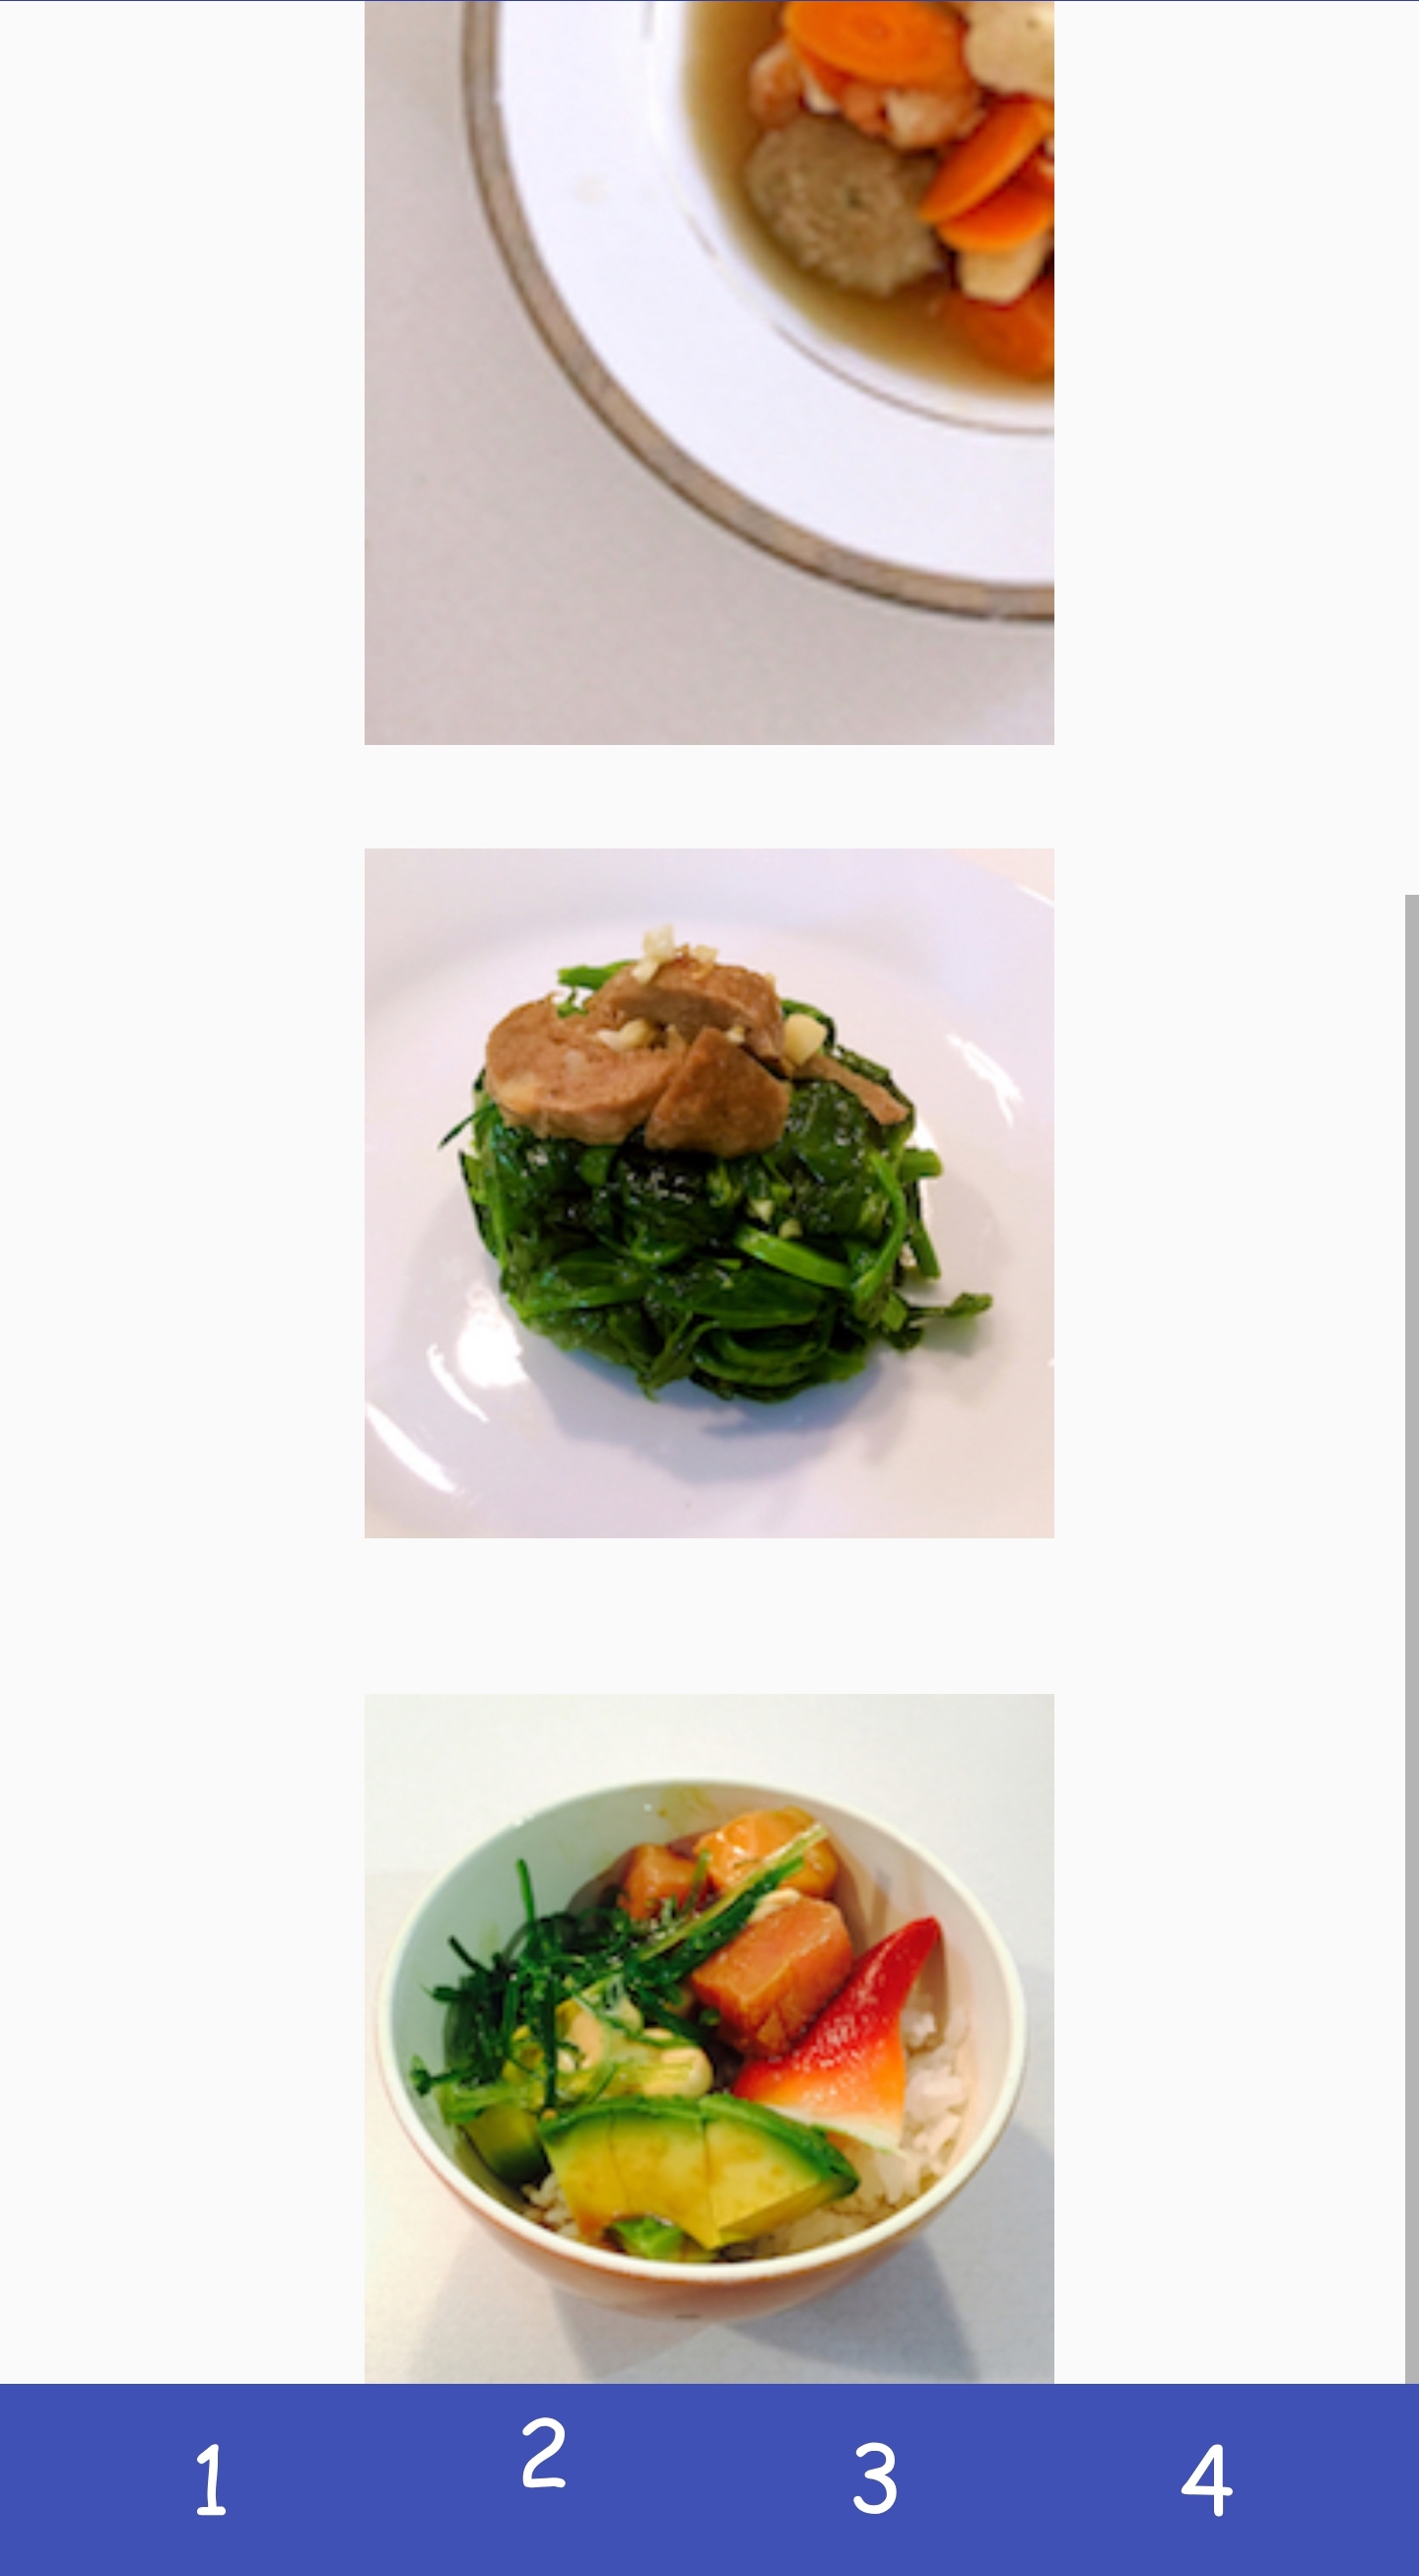
- Working with a basic
ScrollView - Add a fixed number of items with fixed constraints.
In part2.xml we’ve created a basic ScrollView for you wrapped around a ConstraintLayout which will allow its contents to scroll.
Add ImageViews with drawables food_0 through food_3 for a total of four images to the ConstraintLayout.
Let each photo display at its natural resolution. As all three photos are exactly 200px wide, so we can form a perfect column from them.
Using constraints, center them in the parent ConstraintLayout. Then position them such that food_0 is 16dp from the top of the parent layout and each additional food_i is (16 * i)dp from food_(i-1).
That is, food_1 is 16dp below food_0, food_2 is 32dp below food_1, and food_3 is 48dp below food_2. This increasing margin layout will also be used in Part 3. There should be no margin after the last photo. That is, it should be flush with the tab bar.
When the layout is rotated, the images should stay the same size and remain horizontally centered.
Part 3
Tasks:
- Subclass a
ScrollView - Add a variable number of items with programmatic constraints.
This time, we’ll be adding images and constraints programmatically with similar conditions as Part 2.
First, add a ConstraintLayout then create ImageViews for each image to add to the ScrollView.
Using the similar math as part 2, position the first image vMargin px from the top (vMargin is a parameter in Part3View constructor), then the top of each image i afterward vMargin * i px from the bottom of the previous image. Note here we’re working in px. At runtime, all dp values are represented as px which is dependent on the current device resolution. We’ve done this conversion for you. You can see how we convert dp to px in MainActivity#L38.
Again, when the layout is rotated, the images should stay the same size and remain horizontally centered.
Part 4
Tasks:
- Subclass a
ScrollView - Add a variable number of items with programmatic constraints.
- Maintain two balanced columns with “pinterest” ordering.
This will be similar to Part 3 but with two columns. Inside part4_grid.xml, add two LinearLayouts to be our columns. Constrain them such that they equally divide the horizontal space with no padding or margin. When the view is rotated, the columns should change width to maintain the 50% split.
In Part4View, add each image to one of the two columns. By using two LinearLayouts instead of simply adding all images to the parent ConstraintLayout and using constraints to maintain the columns, we reduce the number of constraints required from O(n) to O(1) for n images. Each image should be vMargin from the previous image vertically (or the top of the column if first image). There should be a vMargin gap between the two columns, however, the center of the gap must be in the exact center of the screen. The bottom of the last image should be flush with the bottom of the column. Finally, each image should expand to fill the width as restricted by the margins described above and the height should be such that the aspect ratio matches the source drawable. (Hint: there’s a function which will will do this for you.) When rotated, the images should change width to fit the larger columns.
To determine which column a photo should go in, we will use “pinterest” ordering. You should track the height of the images in each column and add the next image to the shorter column (or the left if equal). Be careful not to track the height of the Drawables as opposed to the display height of the image. Two photos of the same aspect ratio should affect the column height identically regardless of resolution as they will both have the same size on-screen.
Turn-in
Submission Instructions
You will turn in the following files here:
─ part1.xml
─ part2.xml
- Part3View.java
- Part4View.java
- part4_grid.xml
- strings.xml
We will test layout on emulators with different screen sizes. Please use constraint correctly. Don’t just try to match pixels in our sample screenshots.
Grading (10pts)
- Part 1
- Portrait: 1 pt
- Landscape: 1 pt
- Part 2
- Portrait and Landscape: 1 pt
- Part 3
- Portrait: 1 pt
- Landscape: 1 pt
- Part 4
- Correct “Pinterest” column ordering: 2 pts
- (Portrait and Landscape) Correct image widths: 1 pt
- (Portrait and Landscape) Correct image margins: 1 pt
- Code Organization and Style: 1 pt
IDE Errors/Warnings you can ignore
NOTE: An error/warning that can be ignored for this assignment cannot be ignored for every assignment. Check IDE notices against specs on per assignment basis.
Button- Hardcoded Strings
TextView- Hardcoded Strings
ImageView- Missing
contentDescription
- Missing